Wildlife and Nature Photography Tip 29 - Imagine the Invisible.
- Feb 26, 2017
- 3 min read
Just imagine, you are setting up a close-up shot and the beauty and fine color saturation of the subject stands out as a perfect example of Nature's beauty. You take the time to focus, soften and balance the light from the flash with the outdoor light and bingo, you have captured that moment.
Later on, sitting at the digital darkroom with your hot chocolate, you open the image. You now have to remove the distracting original background from the beautiful subject before adding it to the background you have chosen from the files on your desktop. Yikes! Separating the background becomes a visual and technical nightmare of disturbing colors that match your subject. They all become unwilling to help you out as you struggle with the final results.
Isn't there an easier way to do this? Yes there is. I have used my simple home made studio for this example, but if you bring a solid backdrop (many of them are now collapsible) into the field with you, the time you save will be well worth it.
First of all, you will want to have a selection of possibly three colored backdrops. This increases you chances of placing the background that contrasts with your subject's colors. This is the real key to success. It is may times easier to remove backgrounds if they don't contain the subject colors. This is why the movie industry uses green scenes for their productions...it works. Subject edges are much easier to distinguish as you erase the background distractions. The blue in this background (below) doesn't match anything in the subject.
Three steps are involved: One - Shoot the subject with the color separation in the background.

Two - Separate the foreground from the background. This is where you use your eraser tool , (be aware, the software program you use has to have layers for each image), to erase the unwanted color from around the subject. Also, adjust the lighting to be as close to the color temperature and brightness of the background you will be supplying.

Three - Import the image you want to use from another file in your collection to a layer just below the one you were erasing on. I like to use scenes that will provide a compliment in colors to the subject, and I use a blur filter to make them softer - which makes the subject stand out better.

I also make a conscious attempt to balance the color temperature of the close-up subject with the natural scene I use in the background. Sometimes it works better than others, but with practice, you will get better at this.
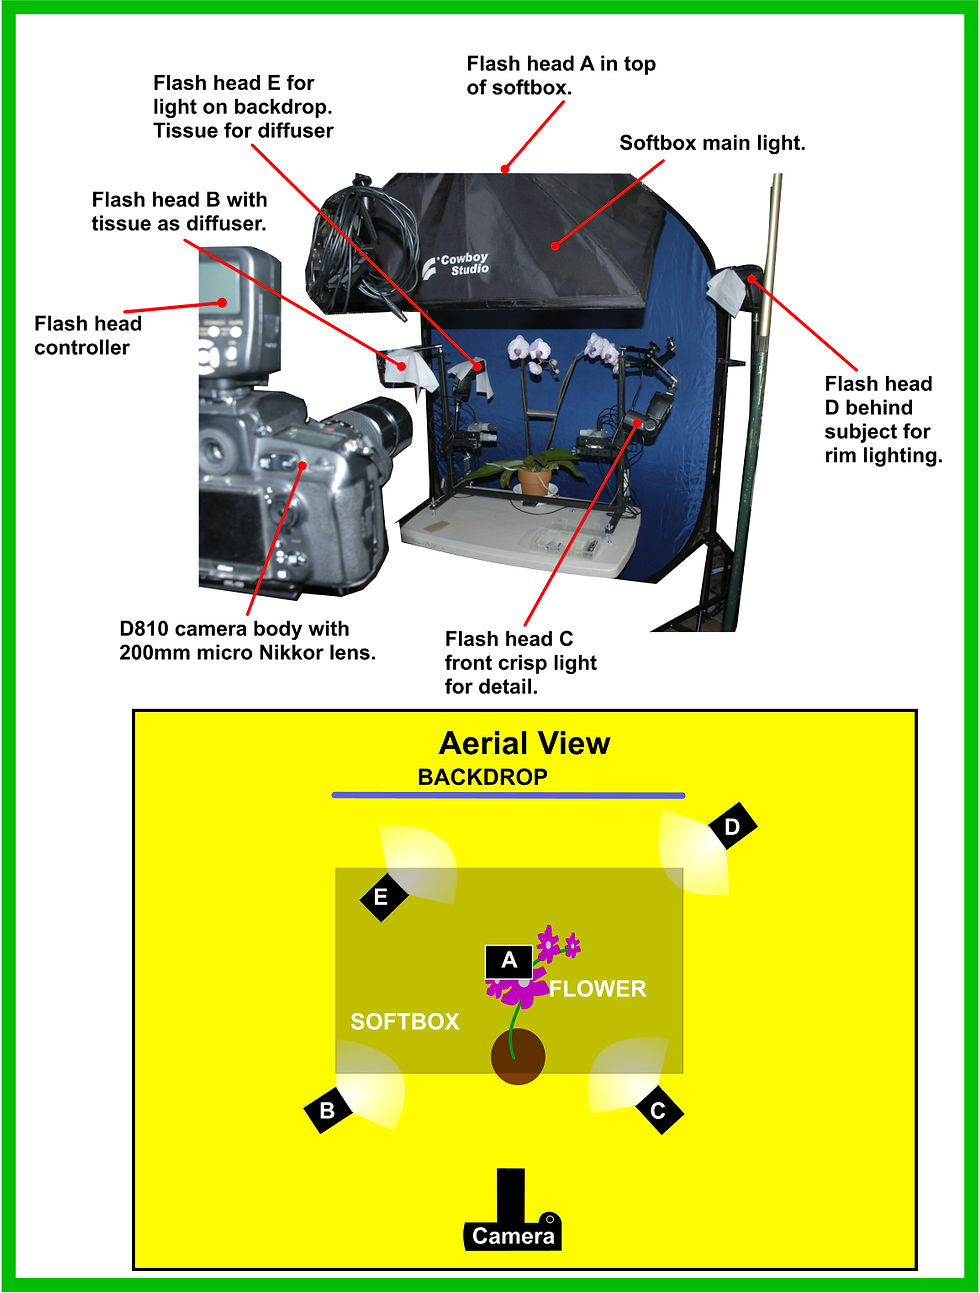
The following setup below is the shooting stage I put together for the shots in the examples here. Your setup and use of lights will not be the same, nor as complex, but the usage of the overall images in layers will be the same.
See the image below if you want to do this at home in the studio setting. It is nice and warm at the home in the winter and cooler in the summer, and you can peruse your results much quicker when you have the computer right there for you.

When I am in the field, I usually have a couple of pieces of colored cloth, the more UNNATURAL THE COLOR, the better. If the cloth can be stretched over a small piece of cardboard, it will make the task of holding the separation colors behind your subject easier.
So the next time you run across a beautiful flower, an insect feeding on a blossom, or maybe the autumn leaves before they fall to winter's calling, you will be able to capture the invisible and add it to the background to share with others later. This technique works well for making holiday cards to share with others. Happy shooting.


Comments