
Wildlife & Nature Photography Tips 12 Can't sleep? Look to the Stars
- Feb 23, 2016
- 5 min read
I am currently parked at a grill on the Eastern side of the Sierra Nevada Range in California, waiting for dinner to be served. I emerged from my layer at 4:30am this morning to view the night sky. So what did I find? Of course, the night sky. But this profound discovery didn't bring me closer to scheduling an activity, so I set my camera up (Nikon D810) with what I thought would be an appropriate lens (Nikon 24-70 f/2.8), and pointed it at the constellations. Since I don't partake in night shooting as a rule, this was a just an experiment in dealing with insomnia while fulfilling my urge for photography at odd hours of the night.
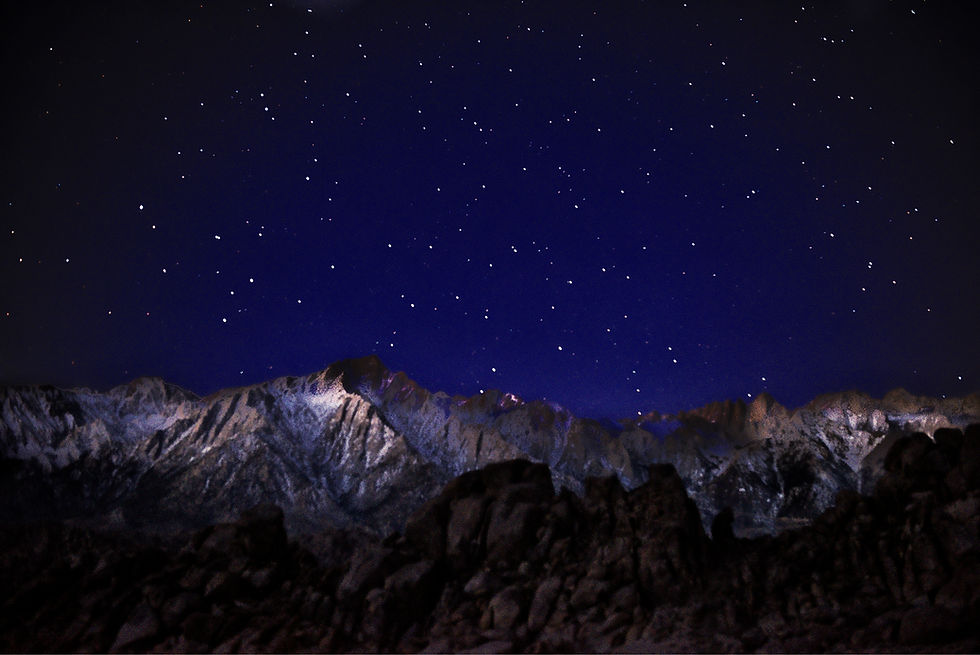
The Alabama Hills lie just West of the town of Lone Pine on the Eastern Sierra. There have been over 400 movies in part filmed here, so you can only imagine that there might be some decent scenery. And you would be correct. The geology had me contemplating the approaching sunrise, and how I could incorporate it into the night sky. (photo below)

Now I have seen many Milky Way shots, Northern Lights, etc, so here is something of my own I came up with. Just to be fair, and not have you think of me as a total self-involved individual, this technique was not invented by me, but I thought I would share with you my spin on the mix - the things that worked, and maybe those that did not.
The first rule that I found I had to break was "Don't shoot with the moon out". You are encouraged, and often expected to Google "night sky darkness maps", and travel to various spots in the world in quest of the blackest, "darkiest" (if that can be a photo term here), night so your stars will show up the best.
Well sometimes a photo trip and moon cycles, along with many other anticipated wildlife opportunities just don't align, but this shouldn't be a prerequisite for a non-shoot moment. Here is what I did find though. The existing low-level light from the moon provides a pleasant glow to the landscape. So this is when I thought it would be nice to include the landscape along with the night sky.
My camera setup for this first shot below illustrates how the landscape can become a sureal setting. Compare them to the scenes during the day, and you come up with a nice mix. to determine exposures, I just totally guessed. Oh Gosh!! He must not be a pro because he just guessed at the exposure. It is not magic to be able to have a preview almost instantly, and adjust accordingly. This is the digital age. Your proofs are provided instantly, so experiment with your settings. My were in the 3 second to 30 second range at 5.6. My ISO varied from 800 to 3200. I was interested in perusing the results to see which settings worked the best for each scene.
Here is what I found. All (all the images I chose to save), for the most part, were fun usuable images. Some of the longer, as well as underexposed images, were more noisy, but they have an almost "Heavy Grainy" old film appearance, which I thought was kind of cool. I did notice that ALL of the images, yes that's right, ALL of the images had required a conciderable amount of post processing (PP) to achieve the desired final look I wanted. So don't go culling the images from your files when you first download them into the computer. They will have a considerable amount of noise. This can be adjusted and reduced until you have some final images to work with.
If you don't have software for working images in post, then shooting at night might not work out quite to your liking, though you will always have some level of final image to print when done. PP plays a large role in obtaining the final result. Many photographers spend a great many hours in PP a single night image. They will also use multiple layers before rendering a final image.
I have not provided specific ISO and exposure times for a simple reason. Each camera manufacturer and model number of body are going to record the night light differently. I use the rear screen playback feature to obtain a general idea of what was captured. I should, at this time, mention that the camera should probably be put on manual mode, providing you with the opportunity to over and under expose each shot. This will give you plenty of images to choose from later.
Tripods are an essential tool for acquiring night shots. Long exposures require a steady platform, and the tripod is the solution. Be sure to have the tripod set on solid ground. This may sound fairly obvious, but I know someone who used the hood of their car for setting up their tripod. The night was cool, and the warmth from the engine was comfortable for them to stand by during the long exposures. Unforescene to him was the refraction of the light rays from the rising heat from the hood. Also, every time he even slightly touched the vehicle, the camera shifted its view very slghtly. The final exposures were far from usuable when he returned from the shoot.
Focusing at night is difficult. What does work? A good wide angle lens, camera with manual setting , and a decent tripod. The wide angle lens provides additional depth of field and will enable you to capture more of the landscape to contrast with the sky. It will also reduced the effect of lines formed from the star movement during longer exposures. It is also easier to compose the shot when the moon is out. I can actually see the scene and place subjects in just the correct spot in the frame. The manual setting in the camera provides you the control to experiment with exposures. The tripod will help you capture the image over long durations of time.
Some photographers will set their tripod up while there is enough light to focus on the scene. They will leave the tripod and camera set up until the time to shoot. Another way some people focus is to focus on scenes during the daylight and mark on a piece of tape that they attach to the lens barrel. That way you can focus on landscapes at night without having to view specific objects in the scene. Autofocusing is set to manual as the camera will continue to search in low-light situations. This will render out of focus shots. Sometimes wildly so.
Looking back at my experiment in the wee hours of the morning, I found it very rewarding. It is quite remarkable the the newer cameras are able to effectively record the night sky and also provide the photographer with plenty of digital darkroom work.
I have include an image taken during the predawn hours and another just after sunrise for you to compare and contrast.


After trying this out, I find night shooting enjoyable. It is quiet, though the desert, I find quite quiet indeed on its own. The darkness adds a bit of mystery to your shots. So the next time you are out camping, don't worry about the moon being out. Just do a bit of howling and capture some images to work on when you arrive back at the PP chair at home. And as always, Happy shooting.


Comments